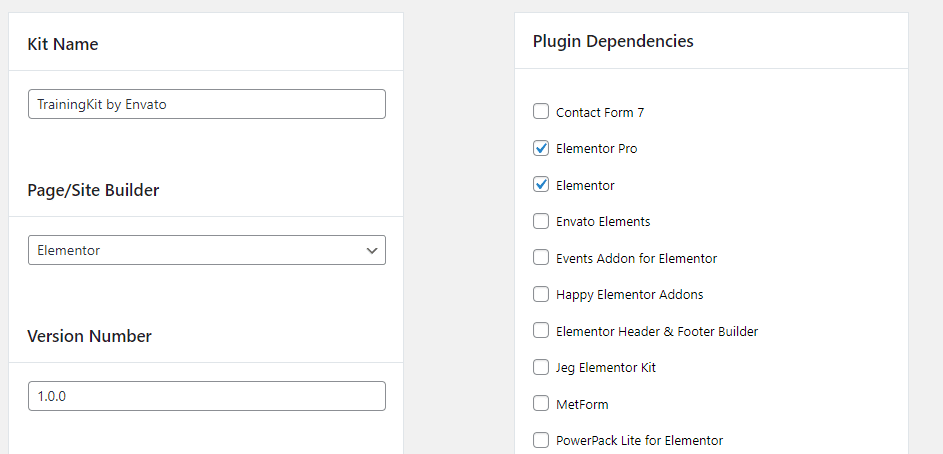
Table of Contents

How to Build

Elementor Template Kits

A guide for Envato Authors

Intro & Goal

Our goal is to make Envato Market the destination to share and discover new, innovative products that don’t just look great and are easy to customize, but offer top performance, user experience and long-term use that help our customers deliver their business goals.

Kit Requirements

  • A Template kit must contain a minimum of 8 page templates, a header and a footer for a total of 10 templates to create a single website.
  • Each template must be unique in layout – variants are not allowed, including same layout/different content or light/dark versions of the same layout.
  • Multiple home page layouts are encouraged.
  • All templates must share a cohesive design and typographic style. For example, a template kit is like one single theme demo, vs several designs in one kit.
  • A kit should not contain just one template type (such as “Landing Page kit” or contain only block templates.
  • When including section block templates, aim to offer alternative layouts or details that are not already found in the page templates. Do not simply cut the home page up into sections and offer those as blocks.

Your Demo

In addition to our general presentation guidelines for Web & Code items, Template Kit demos must adhere to the following guidelines to provide a consistent experience for users.  The demo must:

  • Use the Hello Elementor Theme
  • Only activate plugins used in kit (no SEO, caching, speed enhancing or url changing)
  • Do not use WordPress-level security plugins that restrict IP or anonymize your site. Your host security should be adequate (this can interfere with template data import to other servers/regions if your firewall is misconfigured)
  • Set Permalinks to Post Name
  • PHP 7.4.x – PHP 8
  • PHP Memory Limit 256M
  • PHP Upload Limit at least 256M
  • PHP Max Input Vars at least 3000 
  • PHP Execution Time 60 (120 recommended)
  • WP Debug disabled
  • SSL activated on URL at host level (Please do not use Really Simple SSL plugin) – it is important to do this before staging the kit or you will need to update all urls in the database via Elementor > Tools

Performance

We require your demo to be up and operational for the lifespan of your product listing. Additionally, your kit assets are imported from your demo to the user directly, so it is critical your host is capable of handling the traffic and requests from a variety of servers and locations without aggressive caching or 3rd party optimizations such as minification or CDNs.

  1. Test your demo at https://web.dev/measure/ with only the kit plugins activated and ensure it passes. If you have issues with cumulative shift, tailor any animations to ensure they are timed for a continuous scroll and smooth to load.
  2. Optimize images for small file size. Keep in  mind kits only support gif,  jpg, webp and png at this time (no svg)
  3. Delete unused images or “placeholders” from the media library

Plugins

Be mindful of the plugins you require and the number of plugins used for your kit. Ideally your kit should not require more than 3-4 plugins to reduce the memory load and potential conflicts on user installs. 

We also have some requirements around which plugins you can use to ensure kits are easy to maintain and offer a good user experience. See the WordPress.com banned plugin list at left for an idea of which plugins to avoid both in your kit and on your demo to ensure the best user experience across most WordPress hosts.

  1. Template Kits may only use and require addons designed for Elementor, or which have Elementor Support through builder elements such as some form plugins. The only exception to this rule is WooCommerce.

  2. Plugins must not display ads for premium upgrades or paid services to the user or require upgrades to work like your demo. The only exception to this rule is Elementor Pro. Plugins that link discreetly to a “pro” version in the plugins list or builder are OK.

  3. Plugins must be actively maintained with a compatibility update no older than 60 days and have a decent rating ( please do not include plugins with obvious problems or that do not offer any support)

  4. Plugins must be secure. Check your choices on https://patchstack.com/database/ for major issues.

  5. Plugins must not hijack activation. When testing the import of your kit – the plugin must install and activate without triggering an error or requiring manual installation.

  6. Plugins may not require backend setup or configuration to match your demo – use them on default settings only or avoid plugins that need additional configuration.

  7. All visual customization of plugin elements must be possible in the builder or Customizer (not an Admin area options panel)

  8. Privacy – Plugins may not require user email or account, or opt users in to data collection by default.

  9. Avoid plugins that include a premium/paid template library or other Template service that directly competes with Envato Elements or Elementor such as Essential Addons or Astra / Ultimate Addons. Free templates are fine.

  10. Plugins should not conflict with or modify any aspect of the core Elementor or Elementor Pro functionality. If you notice things like padding options that don’t work, visual CSS changes to your templates after activating a certain plugin, or core elements that do not load or work, chances arer you shouldn’t use the addon.

  11. Plugin functionality cannot depend on custom fields or custom post types (such as a plugin that creates a Portfolio or Gallery post type). Plugins that use the core Post type or WooCommerce Product type are OK. See the link in the sidebar for special instructions regarding the Metform addon.
  12. If you have to change an Elementor setting or admin setting to get a plugin to work in your templates, do not use it. If the plugin causes an error on your test import with the Elements plugin, do not use it.

Elementor Settings

Elementor and other addons should be on default settings with the following exceptions:

Elementor > Settings general tab 
  • Ensure all Template types are checked

  • Check Disable default fonts and Disable default colors

Elementor > Tools

If you see a Fontawesome5 Upgrade tab, click it to upgrade to Fontawesome 5

Elementor > Settings > Experiments

All experiments should be left on Default. Please ensure the Optimized DOM output option has a green icon (Default should be ON)

As of Oct. 1, 2023 All new and updated submitted kits should be using the latest version of Elementor which enables Flexbox Container. Learn more about using the Container here

Elementor > Custom Fonts / Custom Icons

Custom elements are not supported in kit export at this time. Do not include them.

Custom Code

Custom code is any HTML, CSS, Javascript, Shortcode or other manually entered code in Elementor Settings, Site Settings, Page Settings or Widget Settings.

Custom Code is not allowed

  • Do not enter custom code in Elementor Pro or 3rd party plugins
  • No custom Classes 
  • This means no CSS can be used from the WordPress Customizer area or theme stylesheet files. 
  • No Cutsom HTML or Javascript  or HTML elements
  • No Shortcodes – all functionality/content must be built with Elementor elements that can be directly customized by the user using widget controls.

Graphics & Photos

Legal

Photos containing people or trademarks must be sourced from Envato Elements to ensure proper commercial licensing and model release on file. 

Envato Elements illustrations/graphics may not be used in your item as gallery/portfolio/NFT representation. They must be incorporated into the overall design such as editorial use (paired with text), as part of a hero composition or background. 

All Elements assets used in your kit must be added to a Project on download and organized into a Collection on Elements. The Collection link will be used to validate your assets and provide non-Elements subscribers with an easy way to locate and license the kit contents.

All other images or graphics must be sourced from public domain, Creative Commons 0 or licensed sources that allow commercial distribution of the items and which own the items they license.

  • No wallpaper sites or community archives
  • No AI Generated art or people, including Elementor AI images.

 Be prepared to link to the item page where the license is visible for each of those assets (for example, the image download page on Rawpixel, Adobe Stock or Freepik that shows the license type) Read the full requirement here

Credit your images & icons

If your kit includes any graphics or photos from Envato Elements, they must be organized into a Collection on your Elements account and the Collection URL listed in the item description in place of the long list of image links. This is required to support changes to our API and how licensing is shared back to the image authors. If you do not have an active Elements subscription, you can only use items you previously registered in a Project.


From the Image page click the Collection icon and create a new collection, or Add to an existing.

Optimization

Most photos downloaded from Elements or other stock sites are not pre-optimized for web use. You’ll need to optimize your photos using a tool like tinyjpg.com or similar to ensure smallest file size (aim for 250kb or less).

  • Photos should be 72dpi and in jpg or webp format.
  • Backgrounds need to be at least 1920px in width (for fills)
  • All assets should not exceed max width or height of 2500px. This is to fit within WordPress defaults and prevent import errors.
  • Transparent graphics and icons should be in gif or png format. Optimize for smallest file size (can also be done at tinyjpg.com).  SVG in the media library is not allowed in envato kits at this time.
  • Images cannot be precut shapes or have added elements such as effects, embedded text, or graphic overlays as users will need to swap them out and maintain the look of your template. Create all effects and compositions using the builder with layered elements instead.

Examples:

  • To create shapes, use the Advanced > Mask option in elementor
  • Use the background/ background overlay options to add a frame on top of a photo
  • Use absolute positioning or margin tricks to overlay text or graphics on on other images
  • Use the overlay option or CSS image options for overlays, gradients, fades, monochrome, opacity etc
  • Check Elementor Academy or post to the author forum for how to achieve specific effects or compositions if you are unsure.  

Design System & Site Settings

All kits submitted in 2022 now require the Elementor Design System to be in full effect. This means all elements in your kit must use the global font option only.

All font settings must be setup under Site Settings > Global Fonts so the user can customize typography in one place withour repeated steps.

Setup styles here
not here

Readability

  • Use a logical font scale and rem units (or VW units in special cases)
  • Always set line heights in ems
  • Test contrast using a tool like https://colourcontrast.cc/
  • Avoid justified alignment – keep display of other languages in mind
Be sure to read through our full guide on how to correctly setup the Design System and how it works together with the Theme Styles and Template elements:

Elementor Pro

Pro kits must take full advantage of Pro functionality  – use Pro forms and Pro elements wherever possible or where they can add value. Avoid including competing plugins such as header builders or form plugins with Pro kits.
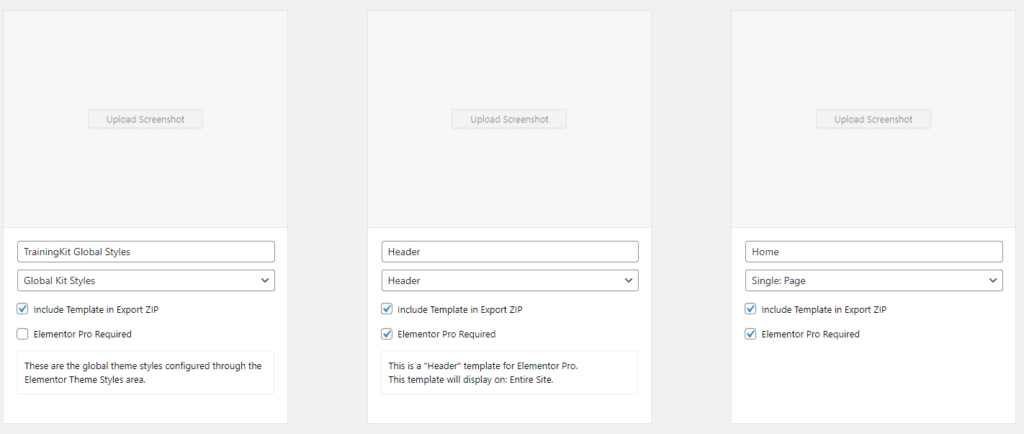
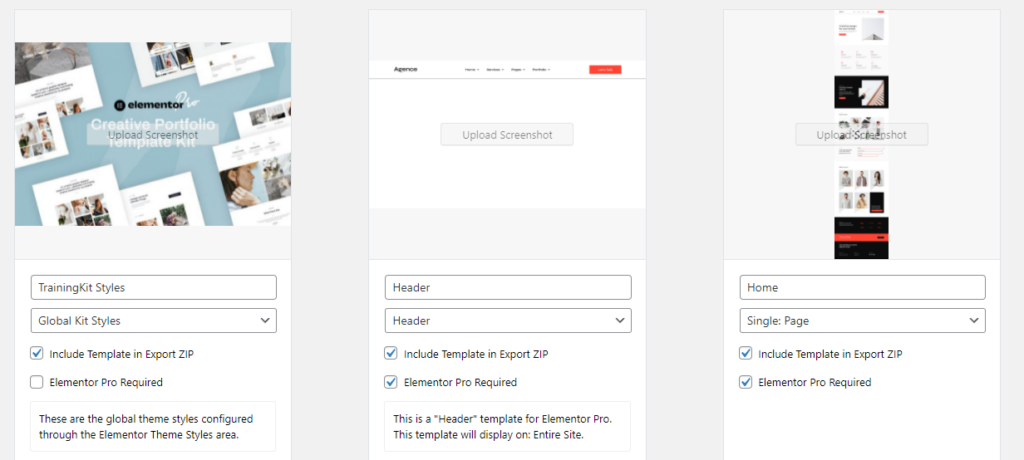
Theme Builder

Kits using Elementor Pro must include full theme builder (global) templates. If your site has a post element on any template, it must include Post Archive and Single Post template.

  • Archive template must use Archive Posts and Archive Title element, not normal Posts /Heading element with condition All Archives 
  • Single Post condition should be set to Posts > All,( not All Singular )
  • 404 Template condition is Pages > 404
  • Header – condition is Entire Site 
  • Footer – condition is Entire Site

Loop Items / Custom Loops

Loop items are for creating custom post list layouts and are a necessity for building dynamic lists of any kind where you want the post item layout to be different than an available post widget allows.

How to determine if a list should be dynamic or not? If the site has user submitted content (job listings, reviews etc) or the content needs to generate RSS (posts or products) it needs a loop or special widget for displaying posts and should not be designed as static elements. The admin will not want to manually update complex listings that frequently change –  reserve static list designs for sites with long-term content (services, destinations, packages, rentals, etc)

While stored in the Theme Builder, Loop items are not treated as global parts. Currently Loop items are not recognized by the Elementor exporter and must be imported to the Template Kit Export area under a new Section (type: other). Users will need to import these blocks to new loop items and then select them in the loop grid, similar to any other block template.

WooCommerce

WooCommerce kits must include the following: 

  • Single Product – Condition: All Products
  • Product Archive – Condition: Product Archives
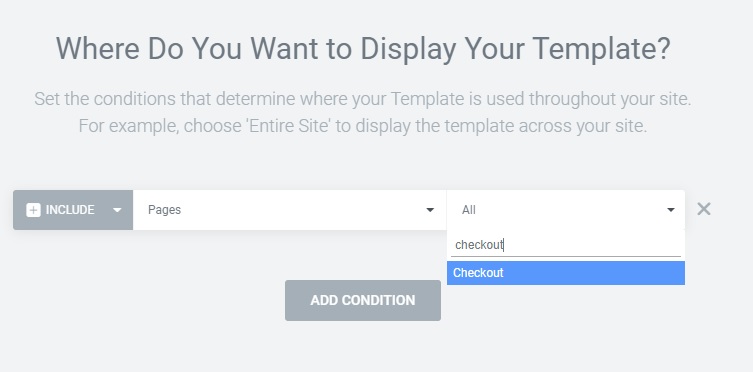
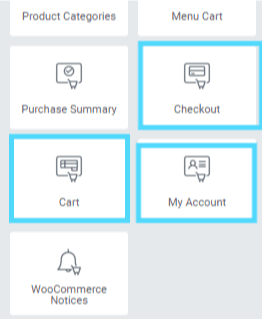
  • Cart, Checkout, My Account, Purchase Summary –  Condition: Pages > WooCommerce Pages > (type to select)

These use the corresponding Pro element to display and should be styled for your kit. Add a product to the cart on the front-end to view full detail.

Annotation on 2022-07-19 at 16-02-37.png

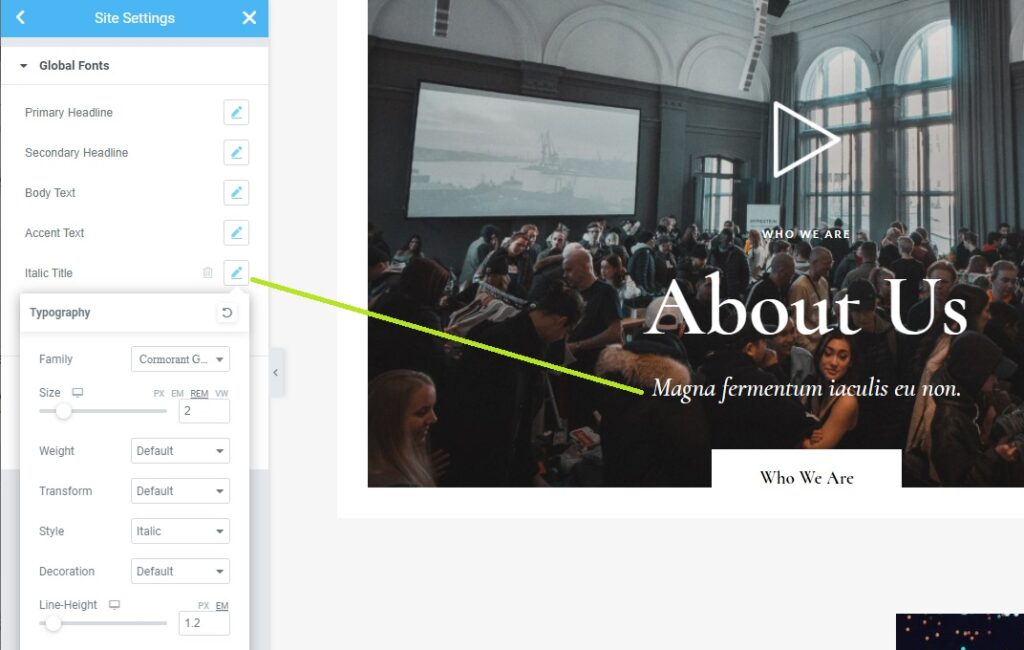
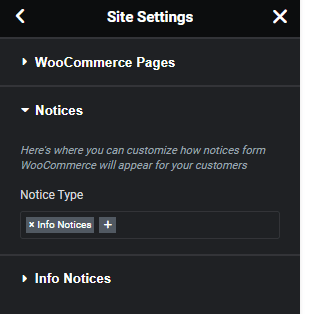
Additionally, Site Settings > WoooCommerce should be configured and linked to the WooCommerce pages in WordPress, and the Info Notice styled for the kit. To test the info notice, add a product to the cart on the front-end. 

Screenshot on 2024-03-25 at 12-01-24.png

Use these elements for each related page and style accordingly.

Building Your Templates

We expect templates to be built using Elementor best practices alongside your own creative or innovative use of the builder elements. Consider the resulting HTML output when building your layouts and make sure they are as straightforward and easy to customize as possible.

  • Name your Sections in the Navigator the way you’d name your photoshop or figma layers to help users find content fast.
  • Templates are created under Templates > Saved Templates by clicking Add New and choosing Page for full pages or Section for single blocks.
Example of section naming

Content & Structure

Expand each tip below for important details.

Use Section min-height with the VH unit for the most responsive results and add only as much padding as needed for the content to space from edges.

Spacers can be used when:

  • You have an empty column that needs its own hieght adjustment in mobile (background images etc)
  • To create  VH sized image elements
  • To break groups of inline elements

Do not use them in place of margins or padding!

% is best in place of an empty column or in some cases of using negative margins. % is relative to the width of the parent element.

You will need to reset these margins in mobile mode, but it is necessary to reduce unecessary HTML output empty columns create.

vh is best for height, including section and spacer height. VH/VW are relative to the browser window size.

ems/rems are best everywhere else in place of px.

Em or Rem units are  are relative to the current font size. They are designed to work such that if I make my font very large (because my eyes are poor) or very small (because I am young and have the eyes of an eagle) I want the white-space around the text to scale with the text. Generally, one doesn’t want 20 pt text with a 5 pixel margin between paragraphs, nor 10 pt text with a 50 pixel margin.

For example one wants text with approximately N lines of white-space between paragraphs. Using N em vertical margins achieves a spacing which adapts to the font size actually rendered.

  • Example: Use image or icon boxes for simple content arrangements instead of individual elements
  • Consider whether inline positioning is better than columns

The Z-Index property specifies the stack order of elements. An element with greater stack order will always be in front of an element with a lower stack order (i.e. an element with a Z-index of 10 will be on top of (in front of) an element with a Z-index of 5.

Using multiple columns is an older technique that generates more HTML than is necessary. Using the Container flexbox controls  + inline positioning on groups of content is both leaner and better for adaptive sizing in the viewport.

Absolute positioned elements don’t adapt well across screen sizes. When overlapping elements inside the same column, it is usually easier to use negative margins to achieve the layout.

If you must use absolute elements, make sure:

  •  z-index is set correctly
  • Use % when position is relative to a boxed container, VH/VW when full width (elements position is relative to the browser edges)

The page preview should not have horizontal scrolling caused by elements falling out of the viewport. 

This is usually caused by negative margins or absolute elements overlapping the left or right edges. If you notice this, enable “Overflow: Hidden” on the container.

Use of addon elements designed for horizontal scrolling are ok (but should not display a default browser scrollbar)

Do not manualy link elements to other pages on your demo, 3rd party websites, your main website.

Affiliate links are not allowed.

Content

  • All headlines must be in English without spelling or grammatical errors and make sense to the niche.
  • Do not copy content from other websites, templates or themes.
  • You may use AI-assisted headline generators and we encourage use of elementor AI for body text.
  • Keep text minimal 
  • Single Post content should demonstrate post content formatting or gutenberg block formatting (avoid wall-of-text filler). See the default post of Hello Elementor demo for example.

Post formatting example in Hello Elementor

Colors

  • Avoid red/green combos for UI elements and ensure all other colors meet accessibility standards for contrast. You may use a tool like contrastchecker if you’re unsure
  • Colors should be consistent and harmonious, including how your stock images resonate with the overall design. Aim for a 60/30/10 balance (where 60 is your overall or background, 30 is the text and 10 is the accent)

See https://colourcontrast.cc/ to check your background and foreground colors and fonts for readability issues

Animations

  • Elements should be animated gracefully with coordinated timing that accentuates the content. 

  • Only use animation when it enhances the design. Avoid using animations where they do not add value such as animating every object to slide in or out just for flash. This is not good UX

  • Do not use default settings without testing reaults

  • When in doubt, vertical animations have an overall better performance than left-right or diagonal animations if you do not want to do the extra work to clip them properly.

Template Variants & Widget Variants Not Allowed

Unlike themes, every page of your template kit should have real-world UX value with a clear path to action. 

  • Do not include page templates or variants of the same layout with only one widget (such as a “Masonry Gallery” template just demonstrating the masonry setting of a widget). 
  • Do not include Page layout variants that are the same layout with different images or text 
  • Do not include page layouts that are the same but different colors (such as a “light” and “dark” version of the same template)
  • Do include Section block templates that offer an alternate layout or style of a single element or section of content if it adds value.

Functionality

Do not mockup functionality – make sure implied functionality work as intended. 

Unlike Figma or Adobe templates, Elementor templates are not concepts – they must work as advertised. Functionality refers to parts of the design that do something – usually in connection with WordPress or a plugin. Functionality might include posts, post dates, likes, review counts, any UI element like a toggle or switch – when users view your template they will expect these dynamic pieces to work as advertised.

Forms

    • Forms must use an Elementor addon and be fully customizeable/accessible from the Elementor Builder. This includes Elementor Pro, Metform and WPForms. Avoid specifying services like Mailchimp, Constant Contact or similar or form plugins that require complicated admin setup/HTML coding such as Contact Form 7.
    • Elementor Pro Forms must include success and error messages and a unique form ID Form styling should be setup under Site Settings > Forms, even if you do not use Elementor Pro in your kit. This ensures other form fields, such as WooCommerce checkout, can attempt to match your style.
    • Forms should use default settings whenever possible. Do not configure with any third party email address or hooks.
    • Do not add insecure fields to the form such as passwords or upload fields.
      • Login and register forms must use the WordPress login and register forms. You cannot create a custom comments form that interacts with the post comment system correctly using these form plugins. Use Elementor addons with Post Comments widgets only.
    • Form plugins may not be used to mockup comments, checkout or any functionality they canot actually perform.
    • All Forms must have a unique Form name on the general tab of the widget

Responsiveness

Your kit must be tailored for mobile and tablet views using the built-in mobile views in the Elementor builder.

  • Scale fonts from Site Settings with mobile modes activated
  • Reverse columns to keep content flowing in the right order
  • Unset or tailor margins and padding to reduce large gaps. There should be at least 10-20px of padding on the left and right side of the screen in mobile view to prevent text from touching edges and to account for curved screen.
  • Adjust shape dividers
  • Tailor text alignment for the best balance – usually this is centered, except for large paragraphs.
  • Adjust column widths to give content ample room (for example going from 4 across to 2 or 1)
  • Scale images for best fit
  • Reposition or hide absolute elements to prevent overlap or horizontal scrolling.
  • Disable motion effects that are slow or have large movement (for example, fade-ins are ok, but an element that slides down 200px is not great for mobile)
  • Desktop responsiveness is just as important as mobile. Your templates must be responsive up to 2550w and have stable content positioning without major shift or stretching between 1440 and 2550. (You may use a service like browserling or a Chrome extension like Window Resizer) This test can help you determine where you may need to used “Boxed” at 1600 vs “Full Width” in some cases.

Exporting Your Kit for Review

Before you begin, visit Templates > Saved Templates in Elementor and export/delete all development templates or templates that should not be included in your kit.

  • Next, select all remaining templates and Export. This is your first backup.
  • Ensure the Template Kit Export plugin is installed and activated.

Define your kit

  1. Go to Template Kit >Templates and create your first new template by choosing Single – Page
    • Ignore the Single – Home type. this is not used with the current version of Elementor.
  2. Click the gear icon at lower-left of the builder to access Page Options and ensure Elementor Full Width and Hide Page Title are set.
  3. Click the gray folder icon to access My Templates and import the Home template. Publish.
  4. Repeat the above to create each of your other page templates
    • For Elementor Pro, you do not need to copy in any Theme Builder templates.
    • If your kit does not use Elementor Pro, create each Section template, including Header and Footer, by selecting the section type and importing the template and publishing. Sections do not need the page options setup.
  5. Go to Template Kit > Export and enter the name of your kit, and carefully check the Plugin Dependencies. 
  6. Do not include Template Kit Import or Envato Elements as required 
  7. Do not include non-Elementor plugins such as firewalls, Yoast SEO or other admin plugins your demo is running
  •  

Review Templates

  1. Ensure the templates you wish to include have “Include in Templte Kit Zip” checked.
  2. Ensure Elementor Pro templates have the Pro requirement checked (skip if not using Pro)
  3. Ensure correct Template Type is selected:
    • Pages must have Single – Page
    • Sections must have Section and appropriate content type selected (header for header, etc)
  4. Drag and drop the templates into the logical import order
    • Header and Footer come first
    • Form, Tab or Slide blocks a page requires must come before the page so they are imported first
    • Pages follow menu order e.g. Home, About, Services etc
    • Section templates not required by pages should come last

Cover Image & Screenshots

Cover Image

  • JPG file format
  • Cover images must have a 3:2 aspect ratio
  • Recommended Dimensions: 2340px (W) x 1560px (H)
  • Minimum Dimensions: 1170px (W) x 780px (H) – aspect ratio 3:2
  • Optimized file size should be under 500kb
  • Must display WordPress logo and Elementor Logo (see elementor brand guidelines)

Template Screenshots

  • The “Global Kit Styles” image must use your item Cover image.
  • Screenshots must be of the entire page – these are displayed on Elements listings and shown when users click the zoom button in the plugin to view the template design before importing. 
  • Disable your admin bar in your user profile in WordPress admin
  • View the page and screencap. We can recommend Awesome Screenshot or Fireshot if you do not have a browser extension for doing this.
  • Header and footer should be captured at full screen. For example,  if capturing the header at 1680w, the header screenshot should be the full 1680×1050 viewport with the header at the top or the full 1680×1050 viewport with the footer at the bottom.
  • Scale the screenshot to 1140px wide, (do not crop height) and save as a jpg in any image program.
  • Upload to the export screen. It will show you the template scaled to height- don’t worry about that as the import plugin will scale it correctly opn import.

Address Problems

The plugin will run a quick check of the setup and json data included in your kit and report any errors to you which may include missing screenshots, titles, unoptimized images, invalid filetypes or 3rd party links. Be sure to address these issues to avoid delays with review.

Source Your Media

A valid source URL must be entered for all photos, graphics and illustrations used in your kit that you did not fully create yourself. These links must be to the image URL which displays the license link or terms clearly, or to an Elements collection containing the image.

If you notice duplicate images or “placeholders” here, please return to the media library to delete them, then double-check your templates to ensure valid images are selected.  

Some plugins like ElementsKit generate several placeholders. It is safe to delete those without it affecting your templates


Export Zip

Once you have successfully packaged your kit, you will be met with a success screen with two code snippets containing the image declarations. You must copy and paste these into the “Text” and “HTML” description areas of your item listing respectively.

When downloading the file, you must ensure it remains zipped. If using Safari browser, ensure “Open Safe Files After Downloading” is unchecked in preferences.

Do not add anything to the zip file or modify it in any way.

Documentation is provided by Envato and Elementor. If your kit requires additional instruction, you may provide documentation link to your website in the HTML description, or as part of your kit’s Design Guideline template if included (recommended!)

Item Descriptions

Your item description should follow the guidelines for all items submitted to Envato Market.

Below are specifics for Template Kits:

Title

Your item title for Envato Kit submissions should follow this format:

ItemName – [descriptive keyword] Elementor Template Kit

Your title should not use any of the following:

  • “WordPress”
  • “Website”
  • “HTML”
  • “Theme”
  • “Free”
  • “Best / Ultimate / Beautiful /” or other subjective words
  • Any common word as the item name like “Portfolio”  or “BusinessKit” etc
  • Any trademark, brand name or existing brand used by other authors

Keywords

Follow our metadata guideline for keywords here: Item Descriptions & Metadata

Do not include the following:

  • “Elementor”
  • “WordPress”
  • “Template Kit”
  • Your author name or other unapproved promotional keywords / coupon codes
  • “Free”

DO include keywords that describe the item or the item’s niche, such as modern, typographic, classic, neumorphism, flat, dark, gradients, illustrations, animations, restaurant, portfolio, menus, etc

If you include keywords for a specific contest or promotion directed by the author team, please note this in your submission notes to the reviewer.

Descriptions

Follow our general guidelines for descriptions here: Item Descriptions & Metadata

  1. Your description should be brief and to the point, describing the item, features and contents. Avoid excessive marketing language or repeating keywords (this is considered keyword stuffing). The first paragraph should aim to be under 60 words.
    • Example: ___  is an Elementor Template Kit for quickly and easily creating websites for your business using the Elementor Page Builder plugin for WordPress. This is not a WordPress theme. Template Kits contain page content for Elementor page builder. This kit has been optimized for use with the free Hello Elementor theme but may be used with most themes that support Elementor. 
  2. List the following at a minimum:
    • Templates included
    • Required Plugins installed with kit
    • Features – this is what sets your kit apart from Themes and competitors. Example:
      • True no-code customization with drag and drop visual builder
      • Customize fonts and colors in one place or fine-tune on individual elements
      • Modern, professional design
      • Fast-loading
      • Works with most Elementor themes.
  3. HTML descriptions should not include text in images that is not written out in your description. This is to ensure your description can be translated and read by search engines.
  4. Include the install instructions at the end of your description and before the image disclosure:

If your kit includes Elementor Pro, your description must include the following Elementor Pro notice:

**Elementor Pro upgrade is required for some templates and features (not included)**

				
					**How to Use Template Kits:**

 Install and Activate the "Envato Elements" plugin from Plugins > Add New in WordPress
 Download your kit file and Do not unzip it

Follow the detailed guide: https://help.market.envato.com/hc/en-us/articles/900000842846-How-to-use-the-Envato-Elements-WordPress-Plugin-v2-0

For help using Elementor, go to Elementor > Get Help in WordPress menu.


Include Elements collection URL

If your item includes Elements assets, you must add the Collection URL along with the photo license disclaimer. This is required to ensure proper licensing of images to users of Elementor or the Elements plugin.

Click your profile icon and go to collections dashboard, click the collection, then click Share. Ensure "Allow link sharing" is enabled. Copy this link into your item description.
				
					This Template Kit uses demo images from Envato Elements. You will need to license these images from Envato Elements to use them on your website, or you can substitute them with your own. 


Select the correct category and type

  • Ensure the category is set to an appropriate sub-category of Elementor > Template Kits. For example, if your kit is focused on weddings, it belongs in the Weddings category, regardless if the demo is using photography, services or events as a business type.  If your kit is focused on video games or e-Sports, it belongs in the Events & Entertainment category, not Apps, etc.
  • If your kit uses Elementor Pro, please select Elementor Pro under Premium Plugin Requirements
  • Select the last Elementor update version. Before selecting any earlier versions, please ensure your item is not using features that have been deprecated in the current version.
  • Select Envato Template Kit.  The Elementor Template Kit types are for a different submission process that do not use the Envato export plugin. 


Include a working demo URL and submit

Make sure the demo URL is functional and lands on the Homepage like a real website (do not link to a landing page/thumbnails, please)

Refer to the following for help formatting your descriptions:

Screen_Shot_2020-10-28_at_6.17.01_pm.png

Convert Markdown to HTML

For internal use only, do not link, distribute or copy.